by Kristen Smeal, Master Gardener
Seed tape is a biodegradable tape that helps with plant spacing in the garden. It is beneficial for planting small seeds that normally require thinning (a gardeners dreaded task) like carrots, lettuces, herbs, and greens (collards, kale, spinach). This can be especially important for children, who have more limited dexterity and tend to “cluster plant.” There are commercially available seed tapes on the market, but it can be expensive and hard to find. With basic household materials, it’s easy to make at home. For elementary-aged students, making seed tape is a good lesson in science and math!
Materials:
Toilet paper, paper towels, or newspaper cut into 1” wide strips
Flour “glue” (1T. Flour + ½ T. water)
Paintbrush
Tweezers
Ruler
Pencil
Seeds
- Make the flour “glue” by mixing 1 T. flour with ½ T. water, slightly more to thicken. It should be the consistency of pudding.
- Cut the toilet paper, newspaper, or paper towel into 1” strips. This can be as long as you’d like your planting row to be.
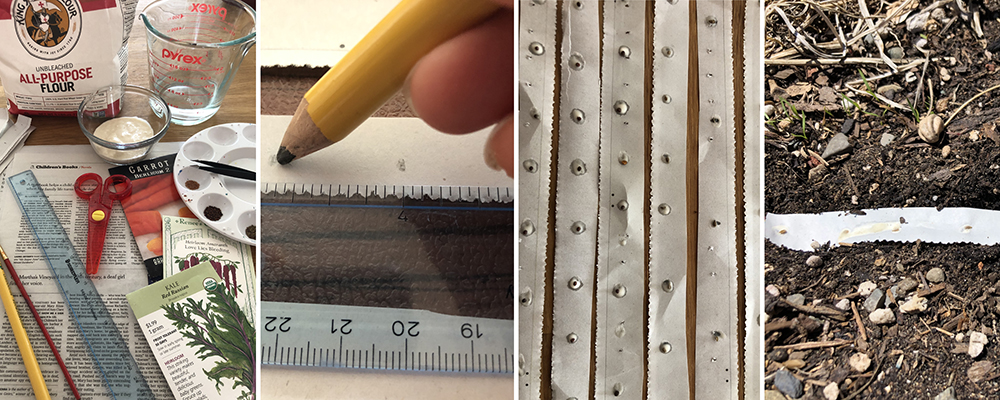
- Check the seed package for spacing and use the ruler to make dots at each spacing interval.
- Using the paintbrush, put a smear of glue on each dot
- Add a seed to each glue dot (may be easier to use tweezers, especially for carrot seeds)
- Allow seed tape to dry for 1-2 hours before planting.
- When ready to plant, dig a trench according to the seed package depth and spread the seed tape out. Cover and wait for sprouts!